
4 Easy DIY Craft Ideas for the 4th of July Patriotic Party
The 4th of July party is in a few days. Now, you've probably figured that out just this week. This year, our Independence Day* celebration will be somewhat different from all previous years since now we must take all possible precautions to avoid the covid-19. There is no shortage of fun ways to celebrate Independence Day.
There are plenty of activities to keep you and your family busy at this time of year. One of our favorites is making patriotic crafts on July 4th like party favors, flower pots, mason jars, Uncle Sam’s paper plate, or even a traditional flag craft.
Memorial Day is near, is time to sing Star Spangled as you Gather up the hot glue gun, some burlap, and all the red, white, and blue art supplies you can find to bring these festive ideas to life, all of which can double-duty as 4th of July decoration.
Help everyone feel happy about being at home by making DIY placemats or bottle centerpieces decorated with flags and stars. Or, give the interior of your home the festive treatment it deserves, by placing a flag pillowcase, a star-embellished kitchen towel, or a burlap banner to hang at the doorway.
Don't forget to create a flower wreath for your front door on July 4th. Let your children participate in making holiday crafts, with ideas such as the July 4 cardboard hats and the popsicle stick flags.
In this way, we can do some easy crafts with the kids and take the opportunity to recycle some things as a scrapbook paper. What do you think if we make cardboard hats with the boys to use, just like them? We can make them from cereal boxes, toilet paper rolls, and corrugated cardboard.
So let's get to work, let's make the 4th of July crafts!
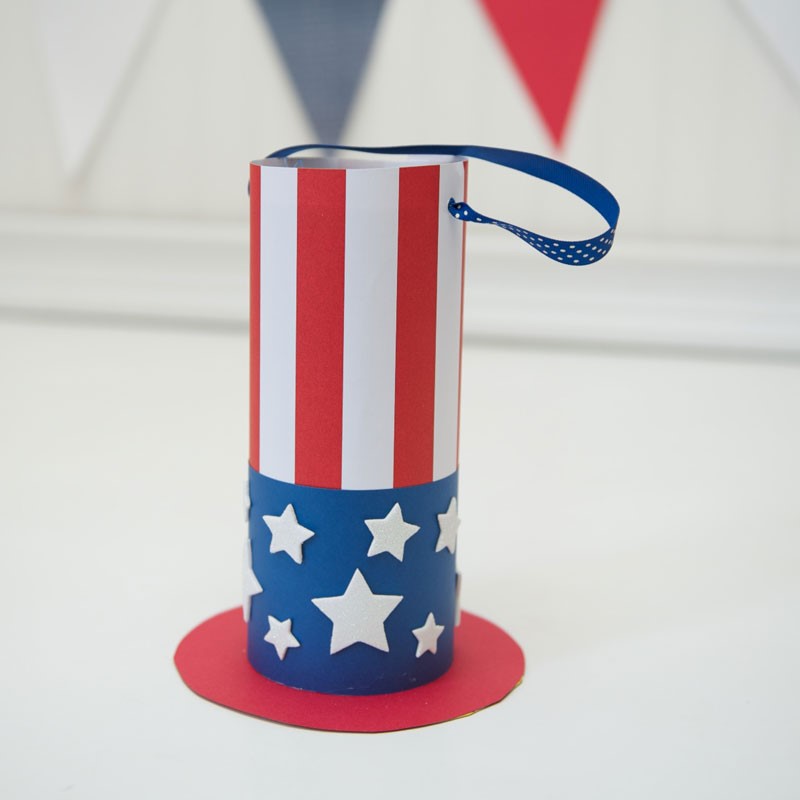
Two different models of DIY Fourth of July cardboard hats
We can make a flat Fourth of July hat. To make this hat, simply:
-
Draw a picture of a hat on a piece of paper. Then cut it out.
-
Trace your hat onto a beautiful, clean piece of corrugated cardboard. Make sure the wrinkled "holes" in your cardboard go up and down the cap, this means that the bottom of your hat must have many holes. We will need those holes in the bottom of your hat to glue the pipe cleaners (or pipe cleaners). Again, cut the shape of your hat.
-
Paint both sides of your hat. Use paint for crafts. You can add some stars and stripes and paint an American flag on it.
-
Take a pipe cleaner (preferably the same color as your hair) and cut it in half. Then glue both pipe cleaners into the holes at the bottom of your hat.
-
Use those pipe cleaners to secure the hat on your headband and voila!
The second headband hat is also SUPER EASY to make. It is cardboard of toilet paper. Fourth of July hat. To make this hat, simply:
-
Take a roll of toilet paper and cut it to the desired length.
-
Trace the roll of toilet paper into a cereal box to create the top of your hat. Cut that circle. (Note: You can cut the circle a little larger than the path. Then you can cut it later.)
-
Draw a larger circle to be the brim of your hat. Cut that circle.
-
Paint your hat pieces!
-
Hot glue your painted hat pieces together.
-
Trim any excess from the top circle as needed.
-
Cut out two pieces of pipe cleaners. Then glue your pipe cleaners to the bottom of your hat. To make sure your pipe cleaners stay in your cap, glue two small strips of felt over your pipe cleaner.
-
Turn the pipe cleaner on its headband, and you're done.
And now you have some lovely hats to wear on this 4th of July. Hopefully, you have fun trying this at home.
Involve children in these crafts so they can have fun making them. It is a way to spend different and fun moments with children.
Now we can also do some.
Flags with popsicles
This is a beautiful and easy last-minute craft to do with children. If your children love to glue and paint, this is the perfect craft for them.
You will need giant popsicle sticks.
Did you know that you can cut popsicle sticks with scissors? It is straightforward to do it with a pair of school scissors
1-You must cut (2) three and a half-inch blades and (3) three-inch blades.
You will also need five uncut ice cream sticks.
2-You will also need some stars that you can cut from white cardboard, or you can also use stickers, paint, or whatever you have around you.
3-Paint your ice cream sticks. You will not need to paint the three, and a half-inch sticks as these will be used to glue your stripes. They'll be in the back so that you won't see them.
4-You will stick your blue sticks on your red stripes; you can use the white glue to hold our flags together.
5-Paste your stars.
6-Then let the flags dry very well.
You can also make an easy jar filled with rice for a patriotic 4th of July centerpiece. It is another DIY project with which children can help decorate a little for this date. They will be happy to be preparing the decoration of July 4.
Fill your jars halfway with the rice, tie around the rim with blue, red, and white ribbons, insert some flags, and place in a space that lacks a little color.
Or you can also put flowers or plants in these jars, without using the rice, the result may be different if you use three different size jars, each with a significant color ribbon, blue, red or white.
Add some fun to our porch for the Fourth of July.
Windsocks
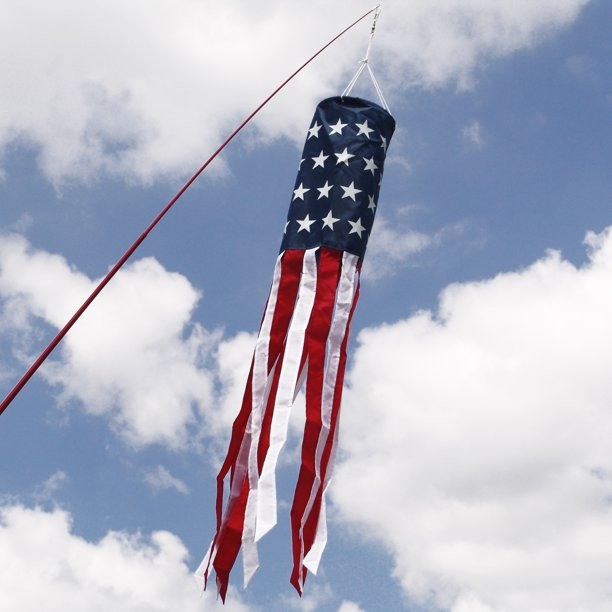
Supplies:
Empty and clean the cans (without the top and bottom)
Sparklet Red Ribbon
White Sparkle Ribbon
Aqua Baker twine
Interior / Exterior Blue Paint
Indoor / Outdoor White Paint
Star template
Template sticker
Paintbrush
Hot glue
Glue gun
Start by painting your cans blue. You may need more than one coat to get good coverage.
-Use your star template and white paint to add stars to your boxes once the blue color is completely dry. No need to plan things, just randomly place your stars.
-When stamping, be sure to use a dry brush. Move the brush up and down on your template to get the coverage you want. Using a dry brush helps the paint not seep under the stencil.
-Now we need to add a way to deliver your windsock. If your kids are young or not ready to use the hot glue gun, just use regular glue or some kind of glue that is good for indoor/outdoor use.
-Put a small amount of hot glue inside the can near the top.
-Put the thread on the hot glue and press down on something other than your finger. Repeat this process two more times to form a twine triangle on top.
-Start with twines about 15 inches long, and I think you probably should have made it a little bit longer to make it easier to tie the top ribbon loop.
-Tie the three strings together at the top by making a loop to hang the windsock.
After they have finished making all the crafts together with your family, you can dedicate yourself to choosing the recipes for the dishes that you will taste that day, likewise, include all family members in the 4th of July Celebration.